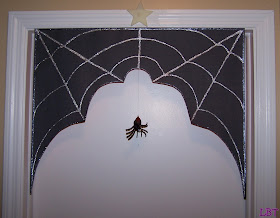
This is such a cute and creepy Halloweenie craft that you and your kids can do. Bubby is 10 and helped make this fantastic specimen and also thinks it is super cool! So easy and fun to make, let's get started!!!
Materials:
Black Poster Board
Scissors
Glitter Glue or Glitter Markers/Crayons/Colored Pencils, etc.
Funky Spider
Fishing Line (or other clear line/rope)
Heavy Duty Tape
Ruler
Chalk
Crafty Headgear...don't forget!
First, make sure you're working with the poster board in the landscape position. Using your chalk and ruler, draw straight lines on the outside edges of the board, just the top edge and the left and right sides. Now, from each corner, draw 2 more lines in toward the middle, see pic below.
Next, take your scissors and starting at the bottom of the board, the point where your left line ends, cut a curved line to the end of the next point. Continue doing this with each point until you have made it back around the ending point of the line on the right edge of the board.
Now you're ready to glitter-fy it. You can see in the picture just above that we started by outlining the outside edges with black glitter. You can do this however you desire and in whatever medium you choose, as long as it can be seen against the black. The glitter just really stands out and catches the light so great and looks super cool! We did all of the inside lines in silver glitter.
Next, make glittery curved lines that mimic those you cut out of the poster board. These don't have to be perfect. Just go with the flow of the curves and have fun with it. You will do a couple of rows of the glitter curves to get the look of a spider web.
 |
| Also notice that we added a center line to give us an anchor point for the center curves. Ok, get your cutie creepy spider guy... Poke a little hole in his bottom and slide your fishing line, cut at your desired length, through the hole and tie a knot that is big enough so the line doesn't slip back out of the spider butt. We wanted the spider to hang down a good bit but not too much to be a nuisance when trying to get in and out of the room. Set spidey aside. |
Here's the tricky part. Not for you, for me! How do I explain how we adhered this whole thing to the door???
Here goes...my husband held the poster board from the front letting the top edge slightly overlap the front of the door frame. While he was holding it there I took our packing tape and pulled off a strip about a foot long & put the tape on the back of both the poster board and the top of the door frame. The tape literally stradles both pieces. I did this with enough tape to cover the entire back edge of the poster board.
Here you can see it from the front with this pathetic close up. ;) That super small, bright green text in the picture says: "See here, from the outside, the board is just on the outside of the top of the door frame"
Now for the final step. This is where you hang your cutie creepy spider guy. I don't have a picture for this because it didn't really come out. I think it was a combo of the clear fishing line and clear tape against the ultra white door frame...not a good close up picture taking combo. But seriously, all you do is get your spider where you want him (doesn't have to be in the middle if you want to change it up), holding the line with it under your thumb up against the under side of the top of the door frame (just behind your poster board) keep your thumb tight on the line & take a small piece of packing tape and tape the line in place where your thumb was. Viola'! Done!
Did that make any sense at all? Whoa! I've read it a few times and I feel like it might be doable with that explanation. Please let me know if you need some more confusing details, I am more than happy to oblige. =)
This decoration was so much fun to make and a huge hit with the boys. This is that perfect craft to get the boys interested, syked and spooked all at the same time. Thanks again Auntie Vy for our fabulous crafty days and these awesome ideas!!!
Happy almost Halloween to everyone. Keep up the great crafty work! I look forward to seeing some of the other fantastic crafts at the killer linky party blogs over on my left sidebar. You should go check them out. There are so many wonderful ideas and talented chicks out there!!!
PEACE LOVE & CREEPINESS!!!


I Love this!!!! Thanks for linking up @ SewWoodsy.blogspot.com!
ReplyDeleteI love this idea....I think it would be cool in windows too. I might have to try this next year. :)
ReplyDeleteJust poppin' over to say hello :) You came over to my neck of the woods today (Vibrant Designs). Btw, if you're not familiar with alemonsqueezyhome.blogspot.com you should check it out. This week is kids craft week. (crafting with your kids...fall/halloween projects) Thought you might want to link up over there...this particular craft since you did it with your little one. :) Cute by the way, and I'm not a Halloween person. Thanks for stopping by!
ReplyDeleteWhat a fun idea! My kids love spider webs all over the house! Thanks for doing away with word verification! You just made the blogging world a better place:)
ReplyDeleteCUTE idea!!!!!!! Thanks so much for linking!
ReplyDeleteVery cute! My 3 year old had me carve his pumpkin with a spider on it. He'd love this!
ReplyDelete