Showing posts with label Sew What. Show all posts

Tuesday, November 2, 2010

Upcycle TooT! Onesie Dress...cause "That's How I Roll"


Doesn't she look like she's about to do something that she shouldn't?  Or maybe she already has!  I love this little thing...she ROCKS my world!!!

This onesie is one of my faves but Buggie has recently become too long for it.  I didn't want to get rid of it yet, couldn't bring myself to do it, so I came up with this.  I have seen some toots (tutorials) on the onesie dress with 1 piece of fabric so this is just my play on that.  I wanted to add camo in somewhere because camo is awesome with red.  I am a bandana nut (the whole fam is) so naturally I was drawn to the red bandana print - which has been in my fabric collection for about 7 years.  I also did a bit of pre-ruffle to the skirt before attaching it to the onesie which gave it more of a full look I think.

So here's how it happened.

Materials 

Outgrown Onesie (or even one that fits that needs a little something else)
2 Coordinating Fabrics
Usual sewing supplies:  machine, thread, scissors, seam ripper ;), ruler, iron


1. Cut off the onesie just above the leg openings.


2. Take some measurements like waist and length.  Decide how long you want the skirt, if you want the strips to be the same size, are you going to pre-ruffle the skirt?  So for mine I decided I wanted the top strip (camo) to be a bit shorter than the bottom strip (red bandana).  They are 4" and 5" respectively.  Then I decided I wanted to make sure it was ruffley-ish (made up word) so I cut the strips about double the waist measurement allowing an extra 1" for seam allowance.


In this pic the strips are folded in half so I could fit them in the shot.
My camo fabric (which was actually a bandanda (told you we kind of have a bandana thing)) wasn't long enough so I cut 2 strips to sew together to make it as long as I needed.
*Make sure you finish one edge of the strip that will be your bottom piece.  You can either hem or serge just go ahead and do it at this step.

3. Pin your strips, right sides together, and sew.  Finish your edges with an overlock or zig zag stitch to keep your material from fraying and give it a clean finish.  (This is particularly important when using bandana's as they tend to fray when cut).  Then open back up and topstitch along the seam where the strips are sewn together. 

Here the strips are sewn together with the finished edge (top of pic)

This is what it looks like when you open them back up

Top stitch

4. Ok, before you ruffle the skirt let's do a little work that will make it a bit easier to attach it to the onesie.  (I really hope that what I am about to type makes sense.)  Lay the skirt out flat and then fold it in half and put a pin in the top at that fold.  This marks the middle of the skirt.  Now open it back up and fold the left side in to the center and do the same with the right side.  Put a pin in the fold that was created on the left side and repeat with the right. 

Now do it again - fold the left side in to the center and the same with the right.  You are going to put another pin in each of the new folds that were created.  You will actually be doing this twice since when you fold there will be 2 layers of material.  Note: you're not pinning through both layers, just a single layer marking each fold with the pins.  I really hope the pics help.  Please let me know if you have any questions.


Showing just the left side of the skirt after I had pinned all the folds.  Notice it is still folded in on itself.  I was hoping this would make it easier to see all the pins.  Egad!

5. Now do the same thing with the onesie.  Fold it in half and put a pin at the fold in both the front and back of the onesie (be careful not to pin it together) marking the center.  Next, fold it in on itself just like the skirt, from the left and the right and put pins at each fold in both the front and back of the onesie.


6. Run a long stitch along the top edge of the skirt, keeping the pins in place.  Then gather it into a ruffle by pulling on the bobbin thread.  Now pin your ruffled skirt to the onesie with right sides together.  You are going to match up your pins on the skirt to the pins on the onesie.  This helps to keep the skirt even and centered which can be hard to do when it's a big ruffled piece.  You will be scrunching and unscrunching the ruffle here and there to get it all worked out around the onesie and get the pins lined up.  Once you have it where you want it go ahead and pin like mad so it stays in place. 

Before sewing it to the onesie you are going to need to close up the skirt.  So unpin the ruffled skirt just enough to be able to pin the raw edges together.  Make sure you pin them with right sides touching.  (Of course I don't have a pic for this, duh, right?)  Now sew and then finish that edge and then pin back on the skirt in place. 


7. Next, sew the skirt on to the onesie using your ruffle stitch as a guide.  I sewed just above that ruffle stitch so that it would be easier to pull out later. 


Be careful that you don't do this or you'll be getting out the seam ripper...argh!

 8. I topstitched the skirt once I sewed it on.  You don't have to do this but I find it helps alot.  You're all done!  Whoot whoot!!!!!


 How stinkin cute is this?!?!?


It's so hard to get a good model shot with a bouncing 14 month old.  She does whatever she wants and does not seem to care that I am trying to get some great pictures.  Oh well, she looks fantastic either way.  This was a fun project and I will be doing many more like this.  I am even thinking on some Mommy size 'onesie' dresses, ahahahahaha, sans the onesie but same idea. 

Thanks for coming over to LBT and checking out my upcycled onesie dress!  I really hope you enjoyed it!!!  As always, please let me know if there is something I can clear up or help you with.   

I am linking up to the fabulous link parties listed in my left side bar.  Go check out some of those awesome blogs, you will not be disappointed.

Leaving you with love and wishes for a beautiful day...it is a gift!

A

Wednesday, October 6, 2010

Toot! (tutorial) The Itsy Bitsy Spider...

...looks awesome on this bib!


I know that's not the original verse but I couldn't help myself.  Itsy Bitsy is one of our favorite tunes in this house and when I recently got my hands on some super cute Halloweenie fabric I knew one of the spooktacular creations I wanted to make had to have an 'itsy bitsy' on it.

This is kind of a mini tutorial.  I am not going to go into too much detail because there are a few bib toots out there and I don't have anything too incredibly special to add......except for Mr. Spider.

Materials needed:
1/4 (not even that much) yard main fabric piece
1/4 (not even that much) yard back fabric piece
Batting, thread, little scissors, sewing machine, sew on velcro


1. First, you will want to use a bib that you like the size and fit of to trace on your fabric.  If you don't exactly like something about the bib then change it up when you are using it as a pattern.  Mine was a little smaller than I would like so I allowed for that when tracing it.  You will also need to allow for about a 1/2" seam allowance when sewing.  You are only doing this on the main, or front, piece of the bib.

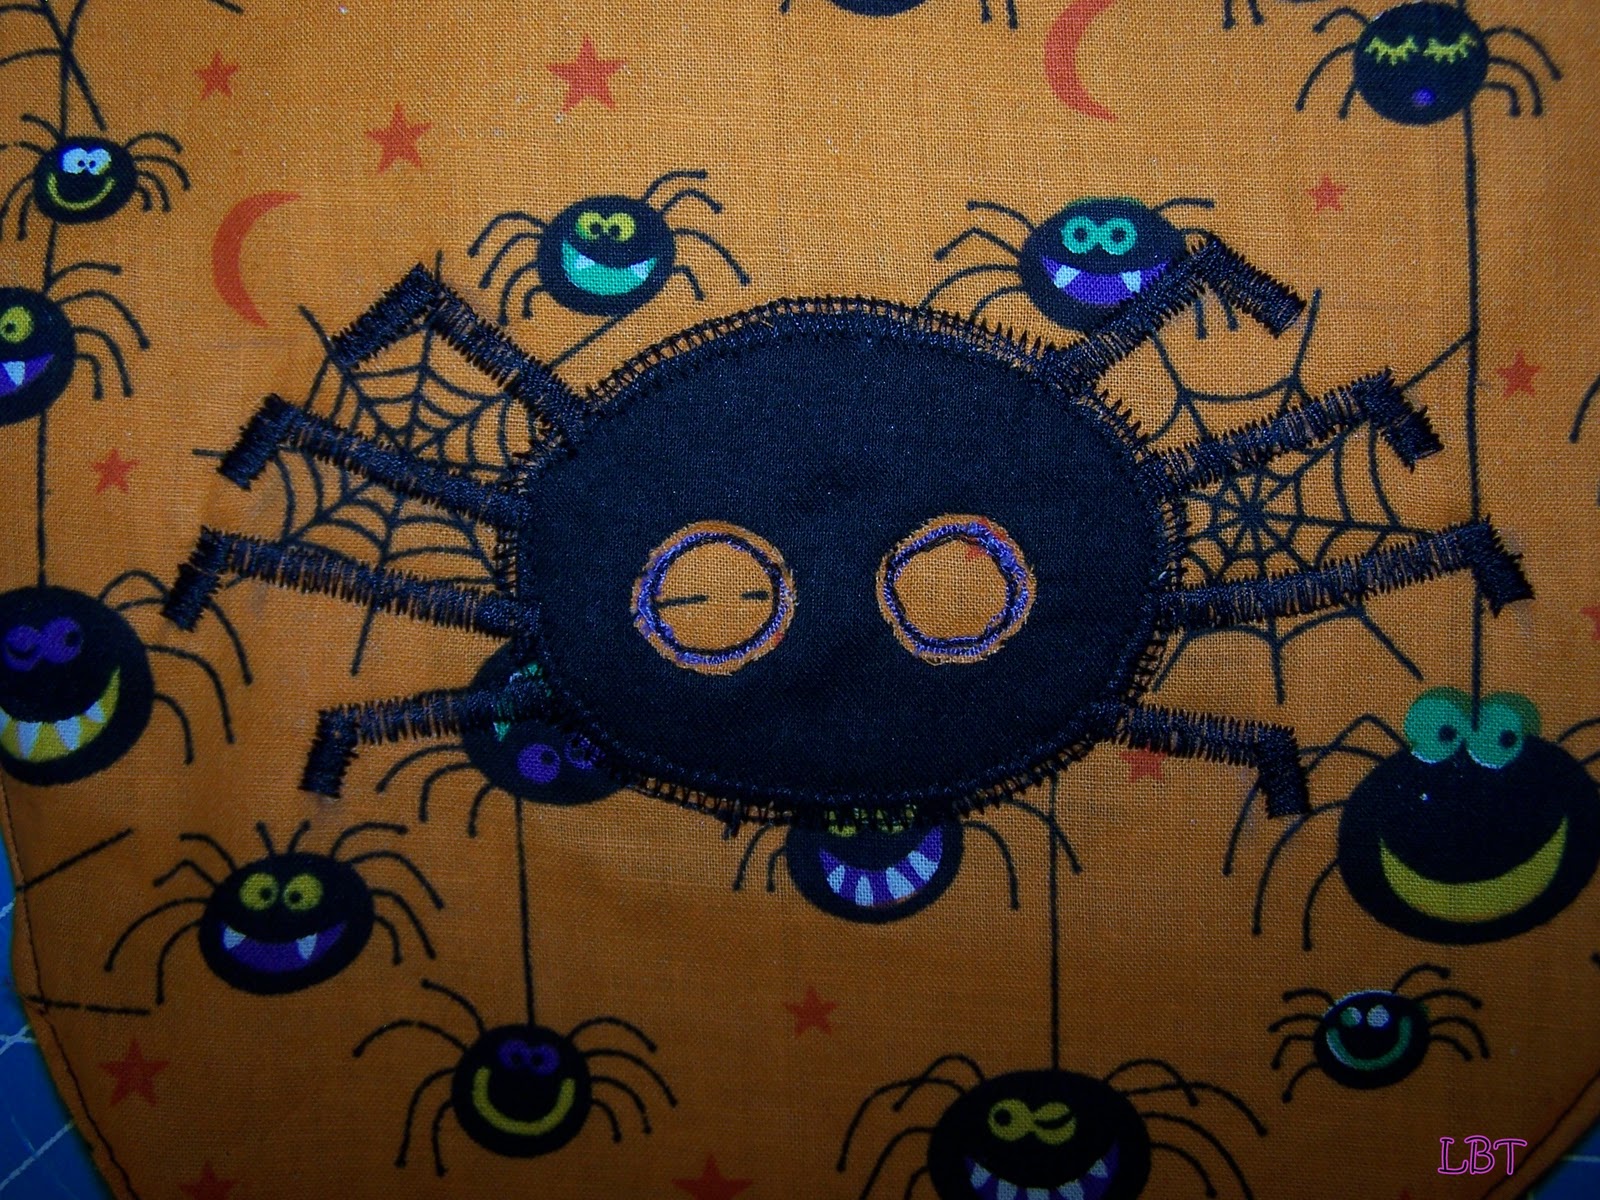
2. Mr. Spider happens to have started as a reverse applique'.  I totally dig the whole reverse applique' thing especially paired with an applique' (which just means that I go back over the reversed one).  You might think that's a little pointless but I love the depth it gives the creature, or whatever it is you are applique'ing ;)  If you do a reverse applique' this is the time to do it, after you have cut out the main piece.


Short Toot within a Toot!
To reverse applique', simply cut out a piece of fabric larger than your intended design (Mr. Spider in my case), this fabric is best if it is a great contrast from your main fabric (like how I used black for my spider body-the black is a great contrast, and complement, to the orange spidery main fabric. sorry I did not show my black fabric in a seperate pic!)  Then iron a piece of fusible interfacing to the backside of your contrast fabric.  Trim to desired size.  Next, you are going to pin the fabric with the interfacing to the wrong side of the piece you are applique'ing.  Pin the interfacing side up.  Then draw out whatever design you are doing on that piece of interfacing you just ironed on.  Now, with a small stitch (I use a 1 on my machine), sew all of the lines you just drew onto the interfacing at least 3 times.  You are literally looking at the interfacing when sewing and doing a 'tracing' of all the lines you drew with your needle and thread about 3 times over.  You should really try to keep your threads connected when moving on to the next spot (ie, on mr.spider, from the main circular body to the little eyes).  I did not do that this time.  I was having some needle issues (and operator error).  When you're done 'tracing' your line a few times you would simply pick up your needle, pull out the fabric just a little bit and line up your needle with the next spot to 'trace'.  This gives it a little more assurance that threads won't pull out.  I ended up having to go over my lines about 5 times so I am not too worried about that...famous last words, right?  Finally, you will turn your fabric over and cut away the material around all of the spots you just sewed.


3. This bib has a layer of batting in the middle.  I layed my front bib piece down on the batting and pinned it in place.  After it was pinned I just went ahead and cut the batting around my pinned piece leaving around a 1/2" allowance.  This is because when you sew the batting sometimes it will 'shrink' or change in size a little bit.
4. Now you can either go ahead and sew the batting to this piece right now (just make sure the batting is on the wrong side of your fabric) or you can cut out the piece for the back of the bib and then sew all 3 at the same time...which is what I did.  Use a 1/4" seam allowance and leave an opening, about 1-1/2", somewhere in the bib to turn it right side out.  Oh, do the same method with your back piece, pin your front piece to it and just cut.  If you plan it right you can have everything pinned and ready to sew in minutes!


In this pic you can see my front piece is wrong side out with it's right side facing the right side of the back piece.  I have my batting pinned to the wrong side of the back piece.  So in my layer sandwich it goes: front piece, back piece, batting (with the front and back pieces right sides together).


Here you can see what it looks like from the back after the bib sandwich has been stitched.  See my opening for turning at the bottom left?
                                                                              
And here it is from the front.  Be sure to trim your batting to match your front and back pieces now that the bib sandwich has been sewn.

5. After you've trimmed your batting go ahead and trim the corners of the bib up around the top where the neck straps meet so that there is less bulk when turning the bib right side out.  I actually trim the entire thing coming close the stitch to allow for a neater looking bib.  I feel like the less bulk the better.  If you do this just make sure you don't trim too close to that stitch or it will pull out.  Now gently turn it right side out through the opening you left.  No pics for this but I'm sure you know what I'm talking about.  I would iron it at this point as well to help it lay flat and allow for ease when top stitching.

6. Top stitch around the entire bib folding in the area that you left open for turning so that you close it completely up.  Sorry, no pic for this either.


7.  Add some sew on velcro.

8. Final step, applique'!!!  I used a basic zig zag stitch for the spider legs.  I just drew right onto the bib the leg placement and followed that along with a 1/2" zig zag.  I also zig zagged around the body of the spider creating some depth.


Love him! 


Please leave me a comment and let me know if something wasn't clear or if I can help explain anything a little better for you.  I am totally visual so I get it if something didn't click!!! 


And please, please, please, I would love pictures if you make a fun bib of your own!


BCD 125


Black Kats Design

HookingupwithHoH


Wednesday, September 22, 2010

HEM JOB. Not too fancy but definitely handy to know... a tutorial

This one is particularly handy in our house because both my husband and I like to cut the ends of our pants off.  We like our pants long, like walk on them long, so if we don't cut them off we end up walking on them and wearing them ragged, literally.  Daniel is tall and rides a motorcycle a lot of the time, if he's not actually working on one, so he needs long pants to sport in the wind.  White chicken legs don't look too hot comin' at you down the highway =D love you D And I just have some sort of sickness that makes me shiver at the sight of the shorty short pant.  I can't take it!!!  It also makes me laugh to know that at least one other person in this world shares my feeling of the too short pant and would go to the same 'lengths' I would to keep that from happening.  It's sick really but whadya gonna do?

You're going to hem them when they get out of control is what you're going to do.  Or when your husband decides the pair of pants he already cut off was a mistake and he would like them back to normal.  I know there are lots of how to's on the hem but I just thought it would be cool to share some pant fixing ideas when the store bought hem is no longer in tack...for whatever reason.

I know it's not so spectacular for my first "how to" but it was really the only sewing I got to do today and I realized that someone else might like to know.  I hope so and maybe you'll see something new or something that would help me to know.  I love to learn new things and I am positive I do not know all there is to know about sewing.  I fear I am just a young Padawan learning to use The Force...so fresh and eager to learn. ;)

Ok, so you've seen what I'm starting with.   This pair is really not too bad so that makes life a little easier.  In this case we are trying to preserve as much of the length as possible.

First, I turned the pants inside out and got them as flat and even as I could.  I cut the edges with my rotary cutter, using a Fiskars ruler as my guide, being careful to only cut what was necessary to make them even.


Next, I did a medium size zig zag stitch all the way around the edges that I just cut off.  This helps to keep the material from further fraying and gives it a nice, clean, finished look. 
Please see picture a few steps later showing this zig zag stitch, not sure how I didn't get a pic but you can see it below.


Then I turned up the hem 1" (you are still working inside out and will be for the remainder of the process) and pinned it all the way around.  Then I ironed it as well being careful to pick up the iron to move it to a new spot instead of dragging it.  This just helps ensure everything stays even and does not get out of whack! (can't have that) ;)


Turning up the hem 1" to pin and then iron.
Tangant:
I have learned over my years, and experience, that it is best to be patient and get it right the first time - I despise seam ripping!  Ugh, I just can't get down with it.  Not when I could be looking at a finished product had I slowed down and taken a few more steps.  With that said, please understand I am talking about me and your skill level or work style could be totally different from mine and that's cool!  I love that there are some many different aspects of art, different points of view.  Such a beautiful thing and as I've said before please let me know if you have a better way to do something...I would loooooove to hear it!!!  Ok, so I usually do all kinds of pinning and ironing to bring me back around to my point so that you know for future reference.  You might think I go overboard but it helps me immensely!
                                                                                

Hem completely pinned up 1" and visual of zig zag from step 2.

After I pressed this 1" hem nice and crisp, I took the pins out, unfolded the hem, leaving a nice crease mark in the pants, and folded the zig zagged edge up to meet the crease that I just ironed into the pants.  Then I pinned all the way around and ironed this down the same way.

Hem turned up to crease; pinned and ironed.


How are you doing so far?  We're almost done!

Finally, I stitched a small to medium straight stitch (#2 length on my machine) all the way around this top edge, this is the same edge that you zig zagged in the beginning.  I actually used the zz stitch as a guide to run my straight stitch.  You will probably have to pull out your pins as you go.


Now just turn the pants right side out and smile at how good they look. =D


 Thanks for sticking this one out with me guys.  I would love some comments, thoughts, ideas....Have a wonderful evening and may your tomorrow be beautiful and bright!!!


Tuesday, September 21, 2010

T-SHIRT DRESS...PUNK STYLE

I just love this dress like mad!!!  It was so much fun to make and got such a great response that I plan to make several of these, punk rock style, with a few options.  I'm thinking stars, skulls, anchors...you know the drill. 
I would also like to do a quick tutorial on it as well with some little tricks and helpful hints.  Is this something you would like to see?  Please let me know and check out a couple more pics below.  Thanks and have a fantastic Tuesday!!!