Showing posts with label Spoonies. Show all posts

Saturday, December 18, 2010

Lemon Drops For Your Forgiveness: A Delicious Apology

And so I'm back, from outerspace, I just signed in to find you there with that blank look upon your face; not one post in 36 days, my blog thinks I'm MIA, but I'm back, yeah, yeah, I'm back, hey ya heyyyyyy!

Okay, sorry, that was torture, I know, but what the hey, man?!?!?!?! Has it really been 36 days since I last shared the madness??? How did that happen, where does the time go?
Buggie is 15 1/2 months old now, in the blink of an eye, do you hear me people, THE BLINK OF AN EYE!!!  My life is just zipping, zooming by, quick, fast and in a hurry, no time for this, no time for that with no consideration for what I want.  No one asked me if I cared that my days would turn into lightning strikes in the sands of the hour glass that is my life.  Why do I not get a say?

Anyway, how does one apologize to the blog world for not being around AT ALL in a VERY LONG TIME?!?!? 

Share an AWESOME COOKIE RECIPE, that's how!

I just baked some wonderful Christmas goodies to share as small tokens of the love that I have for my peeps.  I so want to do something for all of the people in my life that I love and that I wish I could spend more time with.  There really just isn't a feasible way to do that right now.  I can, however, bake some yummy goodness to share and hope that the love I put into it is enjoyed in every tasty morsel! (mush much?)  And share the recipe with you all so that you can be a part of the goodness, too!

These LEMON DROP cookies were a SMASH !!! 
I even heard some one thought they might have been store bought!  That is super cool!!!  I have to thank my Step-Mom for this fantastic recipe and the 'kick in the pants' I needed to get the baking started.  Thanks Grammy, you rock!!! 

Try these out as last minute gifts or to serve on Christmas Eve or just to enjoy when sprawled out on your couch watching Fantasy Factory =)
(Rob & Big and Fantasy Factory marathons on lately - LOVE IT!!!)


Happy Day to you all!  Enjoy yourselves and don't sweat the small stuff...small stuff causes crows feet and you don't want that, do you???  Yeah, that's what I thought!  Love you!!!

PEACE
LOVE
&
YUMMY YUMMY LEMON DROPS !!!

A


(Soft) Lemon Drops
makes 3-4 dozen (depending on size) ((obviously)) ;)

Ingredients
Cookie
1 cup sugar
½ cup butter, softened
¼ cup half & half
2 eggs
2 tsp grated lemon peel
½ tsp lemon extract
2 ½ cups all-purpose flour
1 tsp baking powder
½ tsp salt

Glaze
1 cup powdered sugar
1 to 2 tsp lemon juice


1.   Heat oven to 350°F.  Combine sugar and butter in large bowl.  Beat at medium speed, scraping bowl often, until creamy.  Add half & half, eggs, lemon peel and lemon extract; continue beating until well mixed.  Reduce speed to low, add flour, baking powder and salt.  Beat until well mixed.
*** When baking cookies, I always (unless the recipe specifically states otherwise) cream the butter and sugar together for quite some time until the mixture is creamy and almost ‘fluffy’ – it can’t really be “fluffy” but you get the idea, I think.  Then I add the eggs, one at a time, blending very well after each addition.  I also combine the dry ingredients in a separate bowl and then fold or slowly mix it into the ‘wet’ ingredients that have been completely blended. 
2.   Drop dough by rounded teaspoonful’s 2 inches apart onto greased (or parchment lined) cookie sheets.  Bake for 10 to 12 minutes or until lightly browned.  Cool completely.

3.   Combine powdered sugar and enough lemon juice for desired glazing consistency in small bowl.  Glaze cooled cookies.

I of course got not a single picture of these things.  They went too fast!  I plan to make more very soon so I will update with a picture as soon as that happens.  They are a cute, little, soft yellow cookie with a scone like consistency.  They are only mildly lemon and mildly sweet.  They are perfect as a sweet treat after dinner or with your hot tea (or coffee for you bean heads tehee) ;)
   They are simply AWESOME !!!

If there is any one out there reading this that enjoyed the lemon cookies please leave a comment about their yummy goodness for others to see.  Thank you!!!

I know that doesn't make up for 36 days of absence but I do hope you forgive me and ask that you bare with me as we sk8 through the holidays...literally! 
We are back in the 70's now (yeehaw) so we might be out sk8ing in the street tomorrow (provided the endless rain we had today has decided to cease).

Thursday, November 4, 2010

SPOONIES! Quick Chick In A Pan

***PLEASE FORGIVE THIS REPEAT POST!  I AM ATTEMPTING TO CORRECT A PAGE ERROR.  THIS IS NOT A NEW POST.  THANK YOU!!!***


QUICK CHICK IN A PAN
(chicken and vegetables in one pan)

So, I am no chef, not even by a stretch, but my husband seems to really enjoy my cooking and others who have partaken mention their pleasure as well.  I find it really difficult these days to actually cook a good, healthy, super tasty meal because it just takes so much time!  By the time you prep and then clean up, cook and do pre-clean up (for those of you who know me you know I am a freak with the whole clean factor...like ridiculous!), eat and then do total clean up it's pushing the 2 hour mark and I just can't have that - not now - not ever again, well maybe but not now! 


I know there are others out there who would like to eat well, and feel good about what they are giving their family, but just can't find all of that time, and focus, for kitchen duty.  I am going to try to post some simple, some-what quick meals that I make for us along the way that you can try out and see how it fares at your house.  Again - NO CHEF - but I do enjoy cooking, and try to do it healthfully and thoughtfully.  I hope these help you in any way.  Please let me know what you think.  Thanks!


PEACE - LOVE & I bought a llama !!!


QUICK CHICK IN A PAN

I made this dish on the fly tonight.  I just went grocery shopping on Sunday where I got some fresh zucchini (I really want to try out a farmer's market but I think I have some syndrome or phobia about it...help!) and I wanted Buggie to try it. 
Side Note: She is not doing quite so hot in the vegetable department.  She loves them but still in their super mush version.  I have been trying a few freshie's and she won't have it.  I find bits of slippery squash on the top of our water bottles or pieces of carrot stuck to her shirt.  I am super thankful that despite their goopy form she loves them so I will definitely take what I can get.

Ingredients

3-4    Chicken Breasts (medium size is best, nothing too thick - you can halve the chicken if it's thicker)
2        Large Zucchini, Sliced (not too thin, not too thick)
1        Can Diced Tomatoes, Drained (your fave)
1        Small Onion Chopped (I like small for this but you can chop them to your taste)
3        Cloves of Garlic (or less if you like), Pressed or finely chopped
2-3 TB  Olive Oil (your preference-eyeball it)
Seasonings of Your Choice (I simply used some ground rock salt and crushed red pepper)

You will need to choose a side dish if you would like to add one.  I had utilized a 20 minute window earlier in the afternoon where I was only doing 3 things at once and one of those was cooking whole grain Rotini.  That makes it much easier on me at dinner time - premade side dish, check!

Ok, so, super simple:

  1. Add 2-3 TB of olive oil to a good size fry or sautee' pan (one that has a lid) and heat on medium.
  2. Prepare/Season your chicken breast and place in heated pan.  You can also add the fresh garlic at this point either just before the chicken or with it, totally your choice.  I like to add it just a minute or 2 before the chicken.  Sear about 7 minutes on each side.  Watch your heat so the chicken doesn't cook too fast making it dry.
  3. At this point be slicing your zucchini and onion if you haven't done so already.  Again, I had pre-chopped the onion so it was one less thing I had to do during the cooking process. 
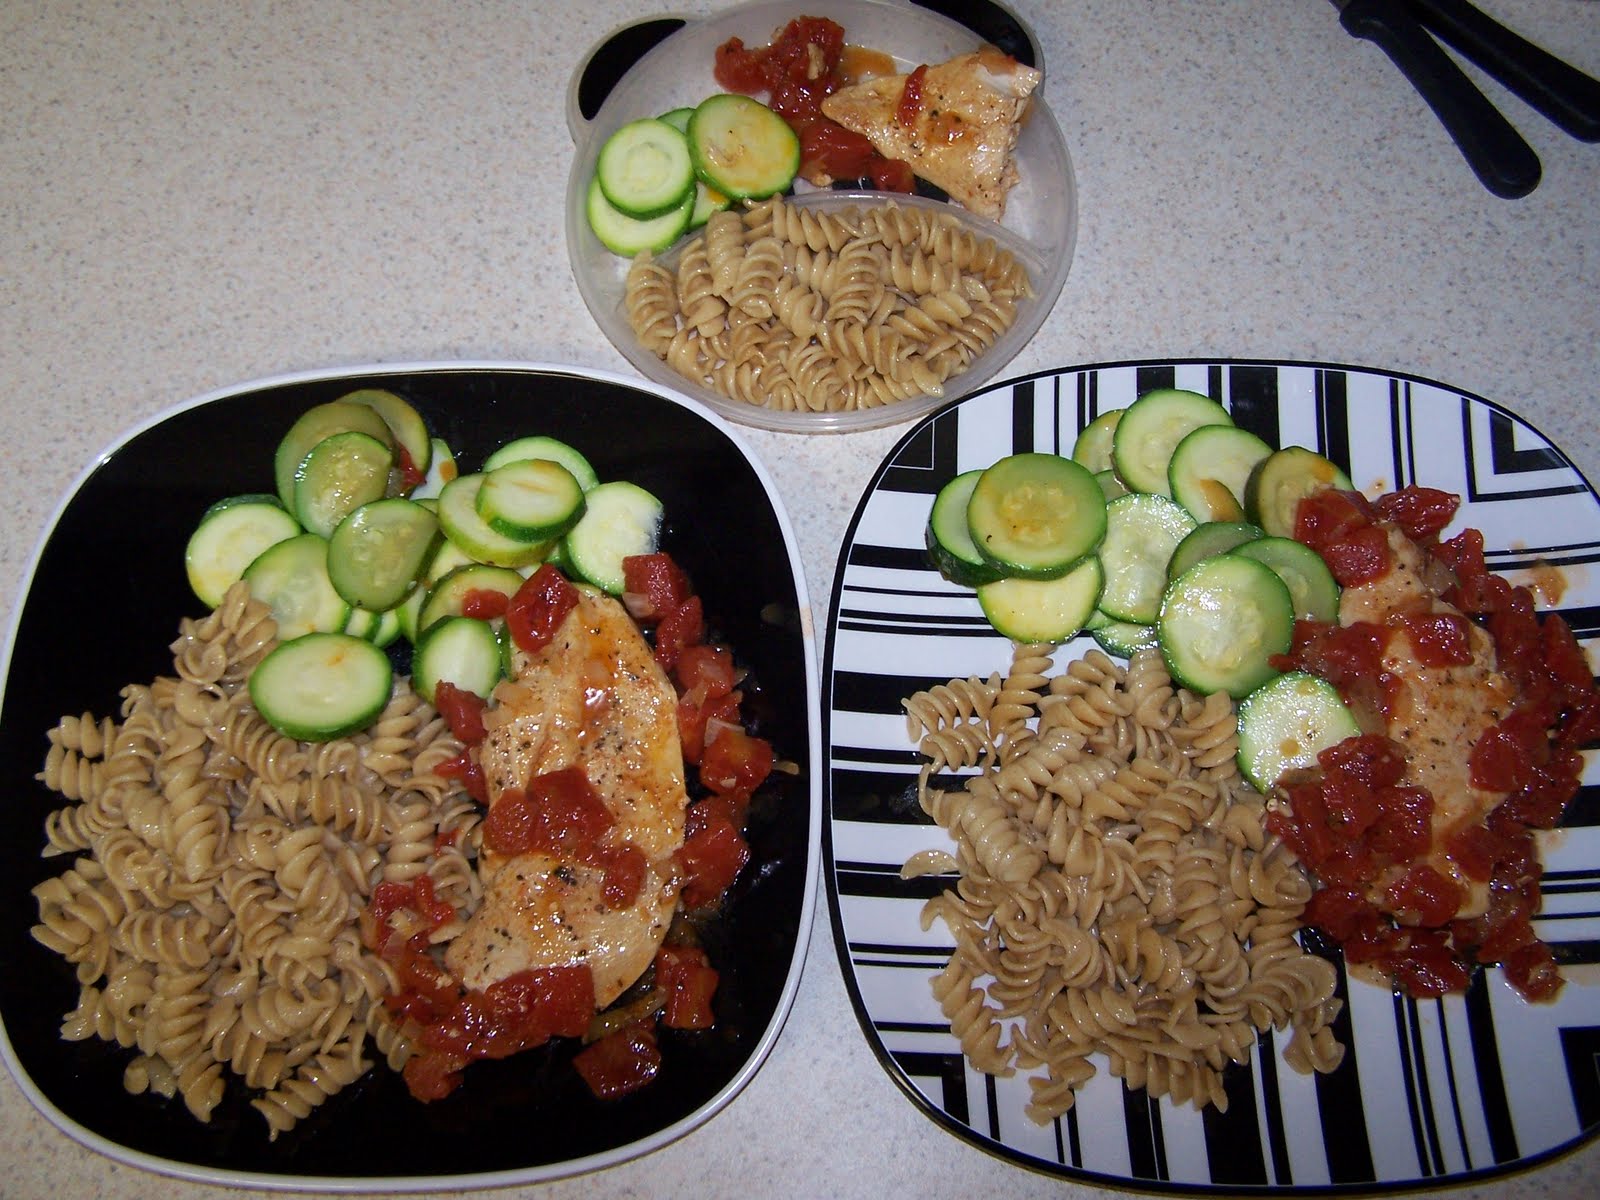
  4. Once the chicken has seared on each side, turn it back on it's original starting side and pour the drained can of tomatoes over the chicken.  You can do your thing here; use canned or chopped fresh.  I prefer canned because it's much quicker for me...tomatoes are slippery little buggers.  See pic of what I used below.  Also add the onion at this point and stir a little bit.
  5. Place the lid on the pan and turn it to low, or medium-low depending on your heat.  Mine is low but what you're looking for is a good simmer, not a boil and not a mumble, a simmer.  Let it cook about 10 minutes. 
  6. Feel free to do one of the 27 other things on your short list for the evening in that 10 minutes or you could JUST SIT DOWN! ;) You could play with your favorite little person(s).  I like to do Buggie's words with her or just snuggle and we play with her toys.  It's so much fun!!!
  7. Add the sliced zucchini all around the top of the pan in an even layer.  There is a pic below to help visualize this (I am totally visual and would probably not know how to do much of anything if I had not seen it done first...seriously).  Then place the lid back on the pan.  Be sure not to stir the zucchini into the mix.  You are going to steam it right on top of the chicken & tomato sauce using it's own juices to produce the steam (see pic).  The slices that are closest to the chicken will be less crisp but that usually works out well, to have some crisp and a few that are softer.  Steam for 8-10 minutes or until desired doneness.  It will most likely be 10 minutes though, just keep an eye on it.
  8. Heat up your pre-made side dish if necessary, serve and enjoy!!!
    
                    
Don't these look like happy plates?  They look a little stuffed but we like to eat and it's usually the only time we actually get a meal so I say "bring it on!"

Sunday, October 17, 2010

Mmmmmmm, Scabs! (Fun Halloween Party Treats)


If you're having any kind of Halloween party or get together, or if you are attending one and need something fun to bring along, you should try this.  It's a disgustingly fun party snack that will have the kids squirming in their costumes.  (and it's healthy, too)

Ok, here's what you need:

Are you ready???

Dried Cranberries (or cherries)
Bowl
Labeling Method
  1. Purchase dried fruit (cranberries or cherries)
  2. Clean bowl
  3. Pour dried fruit into the bowl
  4. Label as "Dried Scabs" - the kids can even make the label, be as fun or scary as you want!


Yep, that's it!  And look how yummy, I mean, how disgusting they look!

How about some pimples?  Every Halloweenie party needs some pimples ripe and ready for the popping!!! eeeewwww, I just grossed myself out typing that =)


These are just pomegranate kernels...seriously, that's it. 

I hope you get a chance to try these out.  They are usually a huge Halloween hit!!!

PEACE - LOVE & BOO

Friday, October 15, 2010

Super Fantastic Vegan Cupcakes...Or Are They???

Yes, they are vegan but they taste like they're not. 

In fact, I have made this recipe several times, as both a cake and cupcakes, and no one was the wiser.  Not even the meatiest of eaters!


Buggie eating her pre-birthday party birthday cake.  This is her actual 1st birthday day.  Since we had festivities planned for the whole family on the weekend, complete with several store bought cakes, I wanted her to at least have something on her actual birth day.  She got a super yummy, round, single layer, vegan birthday cake.  She ate it like it was the very best thing she had ever had.  (I'm sure it was since she had never had anything sweet, except apple juice, before this day)


I made this recipe a couple of weeks ago for my step-sons 10th birthday party.  They were a very big hit - and no one knew they were vegan! 

Even better, the chocolate version (the only version I ever make cuz I'm addicted) tastes like those Hostess Cupcake things you get at the convenient store.  So moist and chocolatey.  But not so good for you.  Make this recipe with chocolate and you can indulge with a little less worry...it still has lots of sugar but no preservatives, no dairy (safe for lactose intolerant or egg allergic friends & family) and tastes real!  I am no fan of chemicals and preservatives and feel like lots of foods, especially sweet treats, taste all fake-ish.  Not this bad boy!  It's totally yummy!!!

Disclaimer: I have found that this recipe tastes the best if you make it about 24 hours before you are going to serve it.  The taste is just richer and smoother the next dayFrom there, eat it in about 2 days (so it's not too great after day 3). 

Ingredients  (why do I want to spell that with an 'a'??? ingrediants, NOT, der)

1-1/2 cups flour
1 cup baking chocolate (powdered, like Hershey's or Nestle)

1 cup sugar (or whatever sweetener you choose - Stevia, etc.)
1 teaspoon baking soda
1/4 teaspoon salt (if baking with chocolate use about 1/2 teaspoon)
1-1/2 cup water
1/3 cup oil
1 tablespoon vanila
1 tablespoon white vinegar (needs to be mild - not like balsamic or red wine)


This version will make an 8x8 or slim 9x9 cake or 1 good size round cake.  If you plan to make a round layer cake you might want to experiment with this.  Using the recipe as is will yield a short layer cake with 2 thin layers, each about 1 to 1-1/2" thick).  If you double the recipe you will get 2 pretty good size layers, about 3" thick each.  It will all depend on how you want your cake to look and how many you need to feed. 

This recipe will also yield 18 to 24 cupcakes depending on how big your cupcakes are.  I use a traditional cupcake tin and get 18 every time but I fill my cups a little more than half full. 

  1. Preheat oven to 350 degrees.  If you are making a cake and plan to take the cake out of the pan go ahead and grease and flour your pan(s) now.  If it's cupcakes than you know what to do (put the cupcake liners in your cupcake pan). =)
  2. Now mix all of your dry ingredients together only.  It does help a little bit to sift the flour but really isn't necessary (I don't think I've done it once).  If you are not making the chocolate version just omit the powdered baking chocolate.
  3. Next, mix in all of your wet ingredients, right into the same bowl as your dry ingrediants - LEAVING THE VINEGAR OUT RIGHT NOW.  I repeat, do not mix in the tablespoon of vinegar yet.
  4. Once everything is blended well and there are no lumps you will be ready to add the vinegar and then put into the oven immediately.  The reaction of the vinegar with the baking soda is what helps take the place of eggs in a traditional cake recipe.  But this reaction is best caught "in the act" so to speak, so you will want to be ready to put your cake/cupcakes right into the oven immediately after you have mixed the vinegar in well.
  5. Bake 30 to 35 minutes or until tooth pick inserted in center comes out clean.  Cool in pan.

***If you find this cake to be too chocolatey for you (is there such a thing???) then back off the powdered chocolate by a 1/2 cup.
  
***If you like the flavor of almond you can add 1/4 teaspoon of almond extract.  I'm not a big fan of the flavor of almond (like almonds just not the extract) but I've heard that it's a good flavor mix with this recipe.

I have a vanilla frosting that I make for these which is also vegan.  I really just kind of eye ball it and play right off of a traditional butter cream frosting.  Here is my best attempt at estimating the measurements.

Ingredients

1 stick softened Willow Run margarine (or other non-butter butter stick)
5 cups powdered sugar
1/2 to 1 cup room temp water (just not very cold)
1 tablespoon vanilla

This is best done with a hand mixer or the oh so coveted (by me) KitchenAid Stand Mixer...I dream of it's black and chrome awesomeness ;) 

  1. Soften your stick of butter.  It's best to take it out of the refrigerator when you start the baking process.  That way it can be softening up the whole time you are mixing and baking and such.  If it's not ready when you are just pop it in the microwave at like 7 second intervals until it is soft, just not quite melted.  Smoosh it in your bowl with your mixer.  Just jab it a few times with the blades you don't have to actually turn it on yet.
  2. Add in 2 cups of powdered sugar.  I would put 2 cups in at a time because there tends to be a powdered sugar poof ball party in the kitchen if you put more than that in.  If you have a stand mixer than you can put it all in.
  3. Add about a half a cup of water and your vanilla.
  4. Mix very well.  Start at a lower speed and increase as your sugar becomes moistened and is no longer dry.
  5. Add in 2 more cups of powdered sugar and about 1/4 cup of water.  Mix well again.
  6. Now is the time to eye ball it.  Does it look like you have enough frosting?  I know for a fact that 5 cups of powdered sugar is enough to frost both 18 cupcakes and a thin layer cake with just a bit left over.  You might be doing fine now.  Just make sure that your frosting tends to form some peaks when your blending it.  If it doesn't want to do that and appears too runny than you are going to have to add the last cup of powdered sugar.  You might not need that last 1/4 cup of water but, again, get those peaks and if not play with your powdered sugar and water ratio.  Keep blending at a medium to medium-high speed until your frosting forms peaks and is a consistency you like.
***You will want to refrigerate this for about an hour so that it sets up a little bit.  I usually make this right after I put the cake or cupcakes in the oven and then put it in the refrigerator and by the time the baking and cooling is done it's about ready to go. 

Frost and ENJOY!!!


I hope you get a chance to try out this recipe and let me know what you think.  I would love to know what variations you made and what fun things you might have added or how you used it.

Please let me know if you have any questions or need any help.  I would love to hear from you!!!

PEACE - LOVE & CHOCOLATE...yummy!

Friday, September 24, 2010

POT ROAST?

Not really. 

This is the perfect time to tell you about my good friend's awesome blog Katie's Cucina.  She has some killer recipes that will literally make your mouth water.  She's been on a cupcake kick lately - YUM MY!!!  Thanks to Katie, my family ate very well quite a few nights when Miss Buggie was fresh.  Thanks Katie, you ROCK!!!  And so do your blogs!

So uncool.  I was hoping to have another Spoonie for you tonight.  A yummy, 20 minute prep "Pot Roast" with potatoes, baby carrots and onions.  I have to tell you, I'm really not sure where my head is these days.  I have a pretty good idea but sheesh!  I got the wrong meat this weekend so what was a planned pot roast, you know, June Clever style, turned out to be an "oven" roast.  Wrong cut, entirely.  It's a bit tougher and doesn't do that pull apart thing that roast does.  I was so looking forward to that yummy, savory flavor...but I digress.  I thought I would still give you the rundown of how I roll with the 1 dish "Pot Roast".

Prep takes about 20 minutes and consists of rinsing and drying your meat, a salt and pepper rub, cleaning and slicing 1 medium onion and about 4 medium potatoes.  Throw it all into a roasting pan (arranging it all nice and pretty around the roast, Martha Stewart style).  Then throw in a whole bag of baby carrots.  Pour seasoned juice around roast, cover it with aluminum foil and roast in a 325 degree oven for about 20 minutes a pound.

For your amusement, I am including a pic below.  Sorry about that.  Hopefully the next one will be better.  


On a different note, you may have noticed some changes to the blog already.  I have a little bit of OCD (and maybe some neurosis thrown in-ahahahahaha) so I am trying to get it right....in my mind at least.  I would love some feedback on the new look so far.  I am sure it will see many more changes in the future but hopefully I am close to done right now.  Thanks for checking it out and have a great day!!!