Saturday, December 18, 2010

Lemon Drops For Your Forgiveness: A Delicious Apology

And so I'm back, from outerspace, I just signed in to find you there with that blank look upon your face; not one post in 36 days, my blog thinks I'm MIA, but I'm back, yeah, yeah, I'm back, hey ya heyyyyyy!

Okay, sorry, that was torture, I know, but what the hey, man?!?!?!?! Has it really been 36 days since I last shared the madness??? How did that happen, where does the time go?
Buggie is 15 1/2 months old now, in the blink of an eye, do you hear me people, THE BLINK OF AN EYE!!!  My life is just zipping, zooming by, quick, fast and in a hurry, no time for this, no time for that with no consideration for what I want.  No one asked me if I cared that my days would turn into lightning strikes in the sands of the hour glass that is my life.  Why do I not get a say?

Anyway, how does one apologize to the blog world for not being around AT ALL in a VERY LONG TIME?!?!? 

Share an AWESOME COOKIE RECIPE, that's how!

I just baked some wonderful Christmas goodies to share as small tokens of the love that I have for my peeps.  I so want to do something for all of the people in my life that I love and that I wish I could spend more time with.  There really just isn't a feasible way to do that right now.  I can, however, bake some yummy goodness to share and hope that the love I put into it is enjoyed in every tasty morsel! (mush much?)  And share the recipe with you all so that you can be a part of the goodness, too!

These LEMON DROP cookies were a SMASH !!! 
I even heard some one thought they might have been store bought!  That is super cool!!!  I have to thank my Step-Mom for this fantastic recipe and the 'kick in the pants' I needed to get the baking started.  Thanks Grammy, you rock!!! 

Try these out as last minute gifts or to serve on Christmas Eve or just to enjoy when sprawled out on your couch watching Fantasy Factory =)
(Rob & Big and Fantasy Factory marathons on lately - LOVE IT!!!)


Happy Day to you all!  Enjoy yourselves and don't sweat the small stuff...small stuff causes crows feet and you don't want that, do you???  Yeah, that's what I thought!  Love you!!!

PEACE
LOVE
&
YUMMY YUMMY LEMON DROPS !!!

A


(Soft) Lemon Drops
makes 3-4 dozen (depending on size) ((obviously)) ;)

Ingredients
Cookie
1 cup sugar
½ cup butter, softened
¼ cup half & half
2 eggs
2 tsp grated lemon peel
½ tsp lemon extract
2 ½ cups all-purpose flour
1 tsp baking powder
½ tsp salt

Glaze
1 cup powdered sugar
1 to 2 tsp lemon juice


1.   Heat oven to 350°F.  Combine sugar and butter in large bowl.  Beat at medium speed, scraping bowl often, until creamy.  Add half & half, eggs, lemon peel and lemon extract; continue beating until well mixed.  Reduce speed to low, add flour, baking powder and salt.  Beat until well mixed.
*** When baking cookies, I always (unless the recipe specifically states otherwise) cream the butter and sugar together for quite some time until the mixture is creamy and almost ‘fluffy’ – it can’t really be “fluffy” but you get the idea, I think.  Then I add the eggs, one at a time, blending very well after each addition.  I also combine the dry ingredients in a separate bowl and then fold or slowly mix it into the ‘wet’ ingredients that have been completely blended. 
2.   Drop dough by rounded teaspoonful’s 2 inches apart onto greased (or parchment lined) cookie sheets.  Bake for 10 to 12 minutes or until lightly browned.  Cool completely.

3.   Combine powdered sugar and enough lemon juice for desired glazing consistency in small bowl.  Glaze cooled cookies.

I of course got not a single picture of these things.  They went too fast!  I plan to make more very soon so I will update with a picture as soon as that happens.  They are a cute, little, soft yellow cookie with a scone like consistency.  They are only mildly lemon and mildly sweet.  They are perfect as a sweet treat after dinner or with your hot tea (or coffee for you bean heads tehee) ;)
   They are simply AWESOME !!!

If there is any one out there reading this that enjoyed the lemon cookies please leave a comment about their yummy goodness for others to see.  Thank you!!!

I know that doesn't make up for 36 days of absence but I do hope you forgive me and ask that you bare with me as we sk8 through the holidays...literally! 
We are back in the 70's now (yeehaw) so we might be out sk8ing in the street tomorrow (provided the endless rain we had today has decided to cease).

Saturday, November 13, 2010

Egad!!! Science Projects...Seriously?!? I Didn't Like 'Em Then...


and I sure don't like 'em now!


Did you guys ever have to do Science Project's in Elementary School???

Did you wait until the very last weekend before it was due to even start it???

I did!

Literally, almost every time, I would not start until it was sooooooo late. 

Alright, so I was a pretty good student and every now and then I would not procrastinate but, um, yeah, I totally slacked...a lot!

It was so hard on my parents, my slacking. 

How do I know this you ask? 

Do I remember how frustrated they were with me?  Not really.

Do I remember the exhaustion on their faces?  Not so much.

Do I remember a lecture about putting things off and how much harder it is when you wait until the last minute?  Ya, that I remember.


But seriously, I know this because I have spent my entire Saturday (sans 3 hours for some house scrubbin and breakfast festivities) working on a Science Project with my husband and my step-son.

3 HOURS !!!


OMGsh!!!

Here's the great part.  In Bubs new school they don't have a Science class.  No Science program, no Science class.

So how is a Science Project still in the mix?!?!?

I don't know, but it is. 

And I'm back in Elementary School (in my mind), sitting at my dining room table, wrought with frustration and the greatest desire to be doing anything else other than working on my Science project all day...because today that's what I did with my step-son...all day.

Aaaaaaaand, we're not finished!

Still lots more to do tomorrow.

Egad!!!

Does any one else out there struggle with this?  Any of this???

Procrastination in your own life?

Last minute Science Projects??

The I'd rather be doing anything else than this blues???

It's no fun...no fun at all.

Thanks for reading my ramblings.  Just had to get that out. 

It is kind of fun doing all of the research again.  I even feel like it's kind of getting me prepared for what it will be like to home-school Buggie.  Can't procrastinate there!

Still don't like Science projects.

Yeah, I said it.


P
L
B

A


Friday, November 12, 2010

Another Feature...Say Whaaaaaat!!!


My DIY No Slip Socks were featured today over at


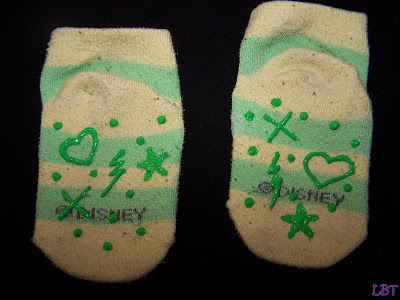
These bad boys right here!

Please go check out Katie's AWESOME blog.  She is very crafty and super talented!!!  I am honored to be featured on her blog.
Yipee!!!

Thank you so much Katie!!!


PEACE
LOVE
&
Funky Socks!!!

A

HAPPY BIRTHDAY MADDIE - Please Read


I have another favor to ask of you, my wonderful readers.

Please go visit this blog


Then wrap your arms around your loved ones and let them know how special they are to you, how much you love them and how important they are in your life.

We are not just here to gain things; attention, possessions, notoriety, fame, wealth...

We are here to love and to be loved.
THAT'S IT!!!

We have it all wrong when we believe for one minute that it's about anything else. 

TO LOVE AND TO BE LOVED...that's all.

Please don't lose sight of why you're here.  Please don't seek and strive after the wrong things, things that don't really mean ANYTHING.

Please go over and visit the Spohr's and share some love.

They need it.

We all need it.

I LOVE YOU ALL!!!

PEACE
LOVE
&
BLESSINGS

A

THIS IS WHAT I KNOW...

Happy Friday to all of you lovelies!

I hope your day is filled with lots of good things and lots of love!!!

I also want to say a special thank you to all of my new followers.  It's so nice to have you and I can't wait to share all kinds of goodies with you and learn even more from you! 

I am also very thankful to those of you who love me so much that you were my first followers...CB, SG, LaLa, BV, KAJ (although it doesn't show you are a follower but I think that you were at one time - weird???)

You are all VERY appreciated and I am glad to have you in my beautiful, bloggy life!!!

Please take a moment to check out this post.

It is an awesome tale and I hope you will take some time from your day to shut everything else out, open up your heart and your mind and just enjoy!

I love you all and look forward to each new day with you!!!

Have a BEAUTIFULLY BLESSED Friday!!!


PEACE
LOVE &
BLESSINGS

A

Thursday, November 11, 2010

TooT! DIY "Thankful" Plaque - Turkey Day Decor


I'm not a decorate-y person.  I don't have boxes in the attic marked 'Valentine's Day', 'St. Patrick's Day', 'Easter', 'Thanksgiving', you get the point.  I have 2 lone Rubbermaid containers - 1 for Halloween and 1 for Christmas. 

After packing up the Halloweenie decor (can you call Halloween decorations decor???), I realized that the house was bare once again (well, except for about 50 toys strewn all over the place).  I felt I needed some fun, festive, Fall decorations to warm up this place. 

I have had the idea for my tablecloth in my mind for a little while now.  I knew that the tablecloth, while super cool, was not going to just stand on it's own.  I am also hosting our family's Turkey Day this year and really wanted a beautiful but clean table display.  So on the hunt I went.  I hunted Fall leaves for the tablecloth, vases (TooT! to come later) and inspiration.

 While I was at the Dollar Tree scoping out Fall leaves and vases I came across an awesome gift bag.  I just loved the pattern and colors and knew that it would not only work for Fall but for our house full time.  I grabbed it up and immediately realized that I needed to make some sort of plaque or framed art work or something with the gift bag as the background.  I then came across a pre-fab'd (fabricated) oval, wooden 'thing' in the crafty area of the $ Tree.  I remembered that I had a nice, new black frame at home that I bought at the Walton's Mega Dome (Wal-Mart) a while back on clearance and thus the 'Thankful' plaque was born...in my mind anyway.

Now it's alive and real and ready for you to make one of your own.  Let's get started! 

This project is so very easy and very inexpensive.  I got the bag and the wooden oval for $1 a piece and I already had the frame which I bet you do too. 
*You can use an existing frame.  Just take out what ever pic you have in it and use the frame during the holiday then put it all back the way you had it when you're ready to.
You probably already have glue of some sort, paint and either paint pens or even one of those ridiculous contraptions they call the Cricut or Silhouette that can do beautiful vinyl letters.

 Side Note:  Who would ever want one of those fabulous, amazing, SUPER AWESOME machines???  They only do EVERYTHING and are the COOLEST things I have ever seen. 
Not me!  I'm totally cool with not having one.
NOT !!!
Dear Silhouette, 
I heart you, very much.
I dream about you.
I love you.
Just sayin'

Can we do this or what? ;) ;) ;)

Materials
I think we've discussed this already but just in case...
Frame of your choice
Background of your choice - can be gift bag, wrapping paper or scrapbook paper
'Plaque'
Regular Glue (Mod Podge, Elmers) and Hot Glue
Paint
 Paint pens or AWESOME vinyl lettering from your SUPER SPECIAL machine


Shot of the oval and gift bag I used

Go ahead and paint your wooden plaque at this point so that it can be drying while you prepare everything else.  I used gloss black spray paint.  You could use anything though.  Maybe acrylic paint or even house paint.  Just do it! 


My 8 x 10 black frame

Carefully take your bag apart - you can do it, just be patient

Look at all of that awesome pattern real estate!

Trace the back of your frame onto the back of
the paper you are using and then cut out

I cut a piece of cardboard to glue my paper to.  I just did this so I
didn't have to use the flimsy board that came with the frame. 
We all have cereal boxes, right? 

Showing my paper and cardboard cut to size.  I then Mod Podged the
paper to the cardboard.  I only applied it to the back of the paper in a nice, thin,
even layer and then adhered it to the cardboard.

Add word of your choice with a paint pen for that home-made, not so perfect look.  If you have one of those boring machines, *yawn, go ahead and cut your beautiful vinyl letters and stick em on, however you all do that. (just jealous, lucky ladies) =)

Add hot glue to the back of your plaque. 
Make sure it's not thick but nice and even and then adhere it to the
pretty, paper covered cardboard piece.

Once dry, put it all in your frame and admire it's beauty!

This thing looks so cool!  It's literally 3D and very elegant looking.  I do sort of like that the letters aren't perfect and have a touch of that home-made look.  Don't get me wrong, I would do a back flip if I could make them perfect with cut out vinyl letters but for now this makes me very happy!


I Hope you are all enjoying your holiday prep and not stressing it.  Why worry about tomorrow when today has enough of it's own worries, right?  It will all work out the way it's suppose to and you will still be standing when it's over so just throw caution to the wind and have fun with it!!!

If you enjoyed this post or have any questions, please comment me.  I would totally love to hear from you!

Happy Thursday and Happy Holiday Crafting!!!

PEACE
LOVE &
Sweet Potatoes - I can't wait for those yummy sweet potatoes!
A


Wednesday, November 10, 2010

TooT! DIY No Slip Socks!


Like most awesome inventions these DIY No Slip Sox were born out of necessity.  Ok, so these aren't necessarily an invention.  I did not invent the sock, thank you that gal (you know it was a female...her little one's toes were probably super chilly so she weaved some wool and knitted up some foot and toe covers, thus socks were born!  I have no idea if that's really what happened but it is in my mind) ;)  I also did not invent the fabric paint.  But I did come up with these on the fly when Buggie ate it in the kitchen 7 times in a row in a matter of like 1 minute and 30 seconds!!!

We all have the store bought grippy socks with the fun little dots or some have designs.  Buggie even has a few pair.  It's not that they are horribly expensive but what if all of your grippy socks are dirty and you just can't stop falling down?!?  Then do this!  You probably have everything you need at home. 
Super cheap, super fun and SUPER CUTE!!!

Here we go...

Materials
Pair of Socks
Fabric paint
Out of the box thinking

Practice pair of socks, can be older and worn and maybe even slightly too small, like these!

Slip small piece of cardboard or wax paper in between the sock layers to protect the other side from paint and to keep them from drying shut :)

Choose your fabric paint.  I don't know how long I have had this stuff but it says it's dimensional fabric paint - but it's not puffy paint.  I have no clue!

Paint some super cute, fun designs on the footy part of the sock.  Make sure you cover enough of the area to actually count.  I later found out that this pair was not covered enough but they are really too small to matter so they just became the practice prototype. *When painting, keep it sort of thick and not pressed into the fabric of the sock.  This will keep it from inter-weaving and becoming flat.  This is key in getting that sticky, grippy effect.  


Here is another very cute pair. 
I just love the 2 color combo, the possiblities are endless!  


There you go.  An easy, fast and very rewarding, no sew project. 


PEACE
LOVE &
Painted Sox!!!

A