Monday, November 8, 2010

I've Been Featured...what whaaat!


How cool is that??? 


My silly little wrist cuff, pin cushion was featured over at What Allie's Making Now.  A super cool blog by a VERY talented chick.  Please go check her out and tell her how awesome she is!

THANK YOU Allie for all of the love!  I'm totally honored.

I will be having a 'do-over' on that little project very soon as I have already realized that I am too tough on them to roll hot glue only.  I will be making a 'simply sewn' version very soon with a TooT to follow.


Coming Soon:
(Tomorrow, hopefully...stinkin time change, throws everything off!)
Mommy UPCYCLE
Using this t-shirt.  Maybe a long dress?  Oh yeah, I'm going for it!


See you blogging beauties later! 

PEACE
   LOVE &
      BLESSINGS

A


Sunday, November 7, 2010

"You Got Another Coming"...Jam Sesh!


Seriously, this is the best day ever!

Guitar hero with my boys.

French toast and turkey bacon brunch.

Cool weather.

And my beautiful baby girl.

Thank you LORD for this day and every Blessing in it...and please help me jam! :)

Hope everyone is having a wonderful weekend and that you're enjoying every minute of it!


***Coming Soon...
Stay tuned.  I'm working on an awesome project for my first guest post ever over at What Allie's Making Now.  I will let you know when I'll be over there but it should be sometime in the next week or two.  You should go check Allie out.  This chick is SERIOUSLY talented, like fa real!!!  She has the cutest little girl, too, who is stylin already in some of the most awesome 'makes' from her Mommy.  Check out this Halloween Witch that Allie created from head to toe - HEAD to TOE!!!  Why are you still here???  Go check it out! ;)

PEACE OUT PEOPLE =)

<3
A

Friday, November 5, 2010

TooT! I HATE Hot Glue!!! Easy Wristlet Pin Cushion


With that being said, this is a NO SEW, HOT GLUE ONLY tutorial.  What is wrong with me? 

I know, I know.  All of blog world has just puffed a sound of disgust.  "You HATE hot glue?!?  What is wrong with you???  You don't even deserve a crafty blog of your own if you hate hot glue!"

Ok, so maybe it's not EVERY ONE thinking that.  Maybe I'm exaggerating a bit but that's what it feels like.  Every time I turn around I see another awesome, spectacular, new fangled, crafty doo-dad I would love to attempt that's made with hot glue.  What is this???  Is there some sort of hot glue conspiracy...against me???  

It burns, it's unforgiving and totally looks a mess when I use it!  Egad!!!      

Yeah, I hate hot glue so what do I do?  I make a hot glue only crafty doo-dad in effort to practice my skills and maybe break down this wall between me and mr. hotty. 

I have been in need of a wrist cuff pin cushion that I can use while sewing.  My work table is not close to my sewing table so I pin my project on my work table and then walk over to my sewing table leaving my pin cushion behind.  Every time!  So then I end up pulling pins as I sew and sticking them in my mouth or on the table and then they fall off.  Very scary since we are always in bare feet!  Hopefully this is the answer.

This was very, very easy and took about 20 minutes from very start to very finish (including time for the glue gun to heat up...and burn me).

Materials

Fabric Scraps
Batting - small amount
Hot Glue Gun and Glue
Cardboard
Patience ;)

*Please forgive the crazy pictures.  I am so not a photographer.  I have been trying to get better and experiment and obviously I still need lots of work!


Cut a strip of card board about the width you would like around your wrist.  We save all of our card board packaging for use in EVERYTHING so it worked out that a mac-n-cheese box worked very well for me.  I just took the box apart and cut the sides off and used both sides and put the rest of the box away for use some other day.  (saves more cardboard from a land fill, yay!) 
Cut 1 of those strips in half.


Turn the flash off, geesh!!!


Use some scrap fabric and hot glue it around one of the half strips you just cut.  Do the same with the long strip


Now use a scrap piece of fabric that's about 3 to 4 times the size of your small covered piece of cardboard and start stuffing it with batting. 


Use some muscle and determination while stuffing and then while hot gluing the batting stuffed fabric closed.  No pic for the gluing process as I didn't have the extra hand.  I was too busy mumbling not-so-niceties under my breath at the hot glue while I was holding, gluing and getting burned!


These are the pieces we have as of now

Now you are going to hot glue the short, covered, rectangular strip to the underside of your batting stuffed puff ball.  Again, no in process pic, I do apologize.


*This is where my camera died and I had to resort to the phone.  Egad!  As if my picture taking skills weren't bad enough!!!*


Now, to clean up the hot mess that resulted from my ridiculous lack of finesse with the glue gun, I covered the whole puff ball contraption with another piece of scrap fabric.  I applied this in the same method as I did when I stuffed the first piece with the batting.  You just wrap it good and tight around the puff ball contraption and then hot glue it all underneath to keep it closed.  You will be keeping the area with the cardboard covered strip as the 'bottom' even though it is within this next layer of fabric.

Showing the size of the fabric scrap I used to cover the puff ball.  Here you can see how the fabric covered cardboard strip is glued on to the puff ball.

Close up of my 'hot' mess

Here's what we have now

Now glue the puff ball on to the center of the long, covered strip, bottom down.


Finally, cut a piece of elastic about 2" long.


Hot glue one end of the elastic to the underside of your wrist band strip and then do the same to the other side.


I went with elastic because the cardboard made it a little too thick to get a simple snap through or that would have been my first choice.  I do like the idea of the elastic though so that I can move it about on my wrist wherever it feels comfortable at the time. 

And ta da!  You're done.  Put it on and get to work!!!  teehee


Well, there it is.  I think it turned out pretty cute and it has been incredibly handy so far.  Not too bad for a 20 minute 'hot' mess. =)

I hope you can dig it too and if you have any questions you know the deal...hit me up!  I am so happy to help!!!

Thanks for sticking with me this long.  Have a fantastic weekend!!!

PEACE
   LOVE &
      Hot Glue...maybe ;)

A
   

Thursday, November 4, 2010

SPOONIES! Quick Chick In A Pan

***PLEASE FORGIVE THIS REPEAT POST!  I AM ATTEMPTING TO CORRECT A PAGE ERROR.  THIS IS NOT A NEW POST.  THANK YOU!!!***


QUICK CHICK IN A PAN
(chicken and vegetables in one pan)

So, I am no chef, not even by a stretch, but my husband seems to really enjoy my cooking and others who have partaken mention their pleasure as well.  I find it really difficult these days to actually cook a good, healthy, super tasty meal because it just takes so much time!  By the time you prep and then clean up, cook and do pre-clean up (for those of you who know me you know I am a freak with the whole clean factor...like ridiculous!), eat and then do total clean up it's pushing the 2 hour mark and I just can't have that - not now - not ever again, well maybe but not now! 


I know there are others out there who would like to eat well, and feel good about what they are giving their family, but just can't find all of that time, and focus, for kitchen duty.  I am going to try to post some simple, some-what quick meals that I make for us along the way that you can try out and see how it fares at your house.  Again - NO CHEF - but I do enjoy cooking, and try to do it healthfully and thoughtfully.  I hope these help you in any way.  Please let me know what you think.  Thanks!


PEACE - LOVE & I bought a llama !!!


QUICK CHICK IN A PAN

I made this dish on the fly tonight.  I just went grocery shopping on Sunday where I got some fresh zucchini (I really want to try out a farmer's market but I think I have some syndrome or phobia about it...help!) and I wanted Buggie to try it. 
Side Note: She is not doing quite so hot in the vegetable department.  She loves them but still in their super mush version.  I have been trying a few freshie's and she won't have it.  I find bits of slippery squash on the top of our water bottles or pieces of carrot stuck to her shirt.  I am super thankful that despite their goopy form she loves them so I will definitely take what I can get.

Ingredients

3-4    Chicken Breasts (medium size is best, nothing too thick - you can halve the chicken if it's thicker)
2        Large Zucchini, Sliced (not too thin, not too thick)
1        Can Diced Tomatoes, Drained (your fave)
1        Small Onion Chopped (I like small for this but you can chop them to your taste)
3        Cloves of Garlic (or less if you like), Pressed or finely chopped
2-3 TB  Olive Oil (your preference-eyeball it)
Seasonings of Your Choice (I simply used some ground rock salt and crushed red pepper)

You will need to choose a side dish if you would like to add one.  I had utilized a 20 minute window earlier in the afternoon where I was only doing 3 things at once and one of those was cooking whole grain Rotini.  That makes it much easier on me at dinner time - premade side dish, check!

Ok, so, super simple:

  1. Add 2-3 TB of olive oil to a good size fry or sautee' pan (one that has a lid) and heat on medium.
  2. Prepare/Season your chicken breast and place in heated pan.  You can also add the fresh garlic at this point either just before the chicken or with it, totally your choice.  I like to add it just a minute or 2 before the chicken.  Sear about 7 minutes on each side.  Watch your heat so the chicken doesn't cook too fast making it dry.
  3. At this point be slicing your zucchini and onion if you haven't done so already.  Again, I had pre-chopped the onion so it was one less thing I had to do during the cooking process. 
  4. Once the chicken has seared on each side, turn it back on it's original starting side and pour the drained can of tomatoes over the chicken.  You can do your thing here; use canned or chopped fresh.  I prefer canned because it's much quicker for me...tomatoes are slippery little buggers.  See pic of what I used below.  Also add the onion at this point and stir a little bit.
  5. Place the lid on the pan and turn it to low, or medium-low depending on your heat.  Mine is low but what you're looking for is a good simmer, not a boil and not a mumble, a simmer.  Let it cook about 10 minutes. 
  6. Feel free to do one of the 27 other things on your short list for the evening in that 10 minutes or you could JUST SIT DOWN! ;) You could play with your favorite little person(s).  I like to do Buggie's words with her or just snuggle and we play with her toys.  It's so much fun!!!
  7. Add the sliced zucchini all around the top of the pan in an even layer.  There is a pic below to help visualize this (I am totally visual and would probably not know how to do much of anything if I had not seen it done first...seriously).  Then place the lid back on the pan.  Be sure not to stir the zucchini into the mix.  You are going to steam it right on top of the chicken & tomato sauce using it's own juices to produce the steam (see pic).  The slices that are closest to the chicken will be less crisp but that usually works out well, to have some crisp and a few that are softer.  Steam for 8-10 minutes or until desired doneness.  It will most likely be 10 minutes though, just keep an eye on it.
  8. Heat up your pre-made side dish if necessary, serve and enjoy!!!
    
                    
Don't these look like happy plates?  They look a little stuffed but we like to eat and it's usually the only time we actually get a meal so I say "bring it on!"

Wednesday, November 3, 2010

Why Do Bad Things Happen To Good People???

I really can't come up with a simple answer for this.  I just know that I'm constantly left wondering 'why bad things happen to good people'.  I know that bad things happen to bad people as well but it just doesn't make sense when it affects the good. 

Andy Irons died today.  Of Dengue Fever.  Seriously.

He was 32.  Married.  Expecting his first child in December.  World Champion Surfer.

And I don't know him personally but you know he's just one of those genuine guys.  I kinda feel like I've grown up watching him.  We are the same age.  Not cool.

So it seems the bad has fallen on the good yet again.  Will there be a silver lining? 

I just thought I'd post a little something I was feeling.  Kind of a tribute to Andy.  My prayers are with the Irons family. 


A

Tuesday, November 2, 2010

Let Me Tell You Something...

                   Dude take a shower Clip Art Glitters Glitterized by FLMNetwork.com


This has been such an eventful day that I just wanted to shout it out loud!  I feel like I don't get much else accomplished in a day except for my normal routine.  You feelin me, Moms?  Taking care of a 14 month old is a full time, 24 hour a day job.   

To get something else done is so absolutely cool that I feel I have to blog about it.  Here it is, my big exciting day, wait for it, wait for it...

I took a shower
ANDDDDDDDDD
VOTED!!!!!!!!!!!

Yeah, I said it, showered and voted!  =D

Seriously, it feels so nice to not only cook and clean and feed and clean and play and teach and clean (I could go on but for sanity's sake, I will not) but to actually get a decent shower and go to the polls...it doesn't get any better.

Ok, it really does get better and I am not in such a stupor that I don't realize I sound like a total craze (I might be a little crazy but that's for another post). ;)  It is nice though to feel like you've accomplished a little more than you had hoped for.  Agreed?

Thanks for reading this far.  Happy Tuesday eve to you all.

PEACE

A

Upcycle TooT! Onesie Dress...cause "That's How I Roll"


Doesn't she look like she's about to do something that she shouldn't?  Or maybe she already has!  I love this little thing...she ROCKS my world!!!

This onesie is one of my faves but Buggie has recently become too long for it.  I didn't want to get rid of it yet, couldn't bring myself to do it, so I came up with this.  I have seen some toots (tutorials) on the onesie dress with 1 piece of fabric so this is just my play on that.  I wanted to add camo in somewhere because camo is awesome with red.  I am a bandana nut (the whole fam is) so naturally I was drawn to the red bandana print - which has been in my fabric collection for about 7 years.  I also did a bit of pre-ruffle to the skirt before attaching it to the onesie which gave it more of a full look I think.

So here's how it happened.

Materials 

Outgrown Onesie (or even one that fits that needs a little something else)
2 Coordinating Fabrics
Usual sewing supplies:  machine, thread, scissors, seam ripper ;), ruler, iron


1. Cut off the onesie just above the leg openings.


2. Take some measurements like waist and length.  Decide how long you want the skirt, if you want the strips to be the same size, are you going to pre-ruffle the skirt?  So for mine I decided I wanted the top strip (camo) to be a bit shorter than the bottom strip (red bandana).  They are 4" and 5" respectively.  Then I decided I wanted to make sure it was ruffley-ish (made up word) so I cut the strips about double the waist measurement allowing an extra 1" for seam allowance.


In this pic the strips are folded in half so I could fit them in the shot.
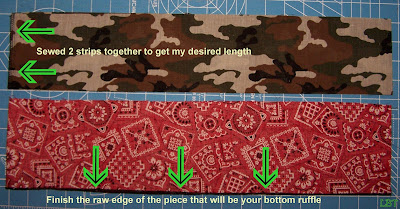
My camo fabric (which was actually a bandanda (told you we kind of have a bandana thing)) wasn't long enough so I cut 2 strips to sew together to make it as long as I needed.
*Make sure you finish one edge of the strip that will be your bottom piece.  You can either hem or serge just go ahead and do it at this step.

3. Pin your strips, right sides together, and sew.  Finish your edges with an overlock or zig zag stitch to keep your material from fraying and give it a clean finish.  (This is particularly important when using bandana's as they tend to fray when cut).  Then open back up and topstitch along the seam where the strips are sewn together. 

Here the strips are sewn together with the finished edge (top of pic)

This is what it looks like when you open them back up

Top stitch

4. Ok, before you ruffle the skirt let's do a little work that will make it a bit easier to attach it to the onesie.  (I really hope that what I am about to type makes sense.)  Lay the skirt out flat and then fold it in half and put a pin in the top at that fold.  This marks the middle of the skirt.  Now open it back up and fold the left side in to the center and do the same with the right side.  Put a pin in the fold that was created on the left side and repeat with the right. 

Now do it again - fold the left side in to the center and the same with the right.  You are going to put another pin in each of the new folds that were created.  You will actually be doing this twice since when you fold there will be 2 layers of material.  Note: you're not pinning through both layers, just a single layer marking each fold with the pins.  I really hope the pics help.  Please let me know if you have any questions.


Showing just the left side of the skirt after I had pinned all the folds.  Notice it is still folded in on itself.  I was hoping this would make it easier to see all the pins.  Egad!

5. Now do the same thing with the onesie.  Fold it in half and put a pin at the fold in both the front and back of the onesie (be careful not to pin it together) marking the center.  Next, fold it in on itself just like the skirt, from the left and the right and put pins at each fold in both the front and back of the onesie.


6. Run a long stitch along the top edge of the skirt, keeping the pins in place.  Then gather it into a ruffle by pulling on the bobbin thread.  Now pin your ruffled skirt to the onesie with right sides together.  You are going to match up your pins on the skirt to the pins on the onesie.  This helps to keep the skirt even and centered which can be hard to do when it's a big ruffled piece.  You will be scrunching and unscrunching the ruffle here and there to get it all worked out around the onesie and get the pins lined up.  Once you have it where you want it go ahead and pin like mad so it stays in place. 

Before sewing it to the onesie you are going to need to close up the skirt.  So unpin the ruffled skirt just enough to be able to pin the raw edges together.  Make sure you pin them with right sides touching.  (Of course I don't have a pic for this, duh, right?)  Now sew and then finish that edge and then pin back on the skirt in place. 


7. Next, sew the skirt on to the onesie using your ruffle stitch as a guide.  I sewed just above that ruffle stitch so that it would be easier to pull out later. 


Be careful that you don't do this or you'll be getting out the seam ripper...argh!

 8. I topstitched the skirt once I sewed it on.  You don't have to do this but I find it helps alot.  You're all done!  Whoot whoot!!!!!


 How stinkin cute is this?!?!?


It's so hard to get a good model shot with a bouncing 14 month old.  She does whatever she wants and does not seem to care that I am trying to get some great pictures.  Oh well, she looks fantastic either way.  This was a fun project and I will be doing many more like this.  I am even thinking on some Mommy size 'onesie' dresses, ahahahahaha, sans the onesie but same idea. 

Thanks for coming over to LBT and checking out my upcycled onesie dress!  I really hope you enjoyed it!!!  As always, please let me know if there is something I can clear up or help you with.   

I am linking up to the fabulous link parties listed in my left side bar.  Go check out some of those awesome blogs, you will not be disappointed.

Leaving you with love and wishes for a beautiful day...it is a gift!

A